What is Git?

Git is the industry standard for version control in the games industry. It allows users to manage the changes they make to thier game files, enabling any team, from solo developers to massive AAA teams, to safely and effeciently work on a game project. Using GitHub Desktop, you will be able to easily create online repositories of your Unity projects. These will serve as a backup, in case of a problem with your computer, and as an easily accessible link to your project for your class to look at your work.
Here are a few terms you will see when following this tutorial
- Git
- This refers to the Git application, the version control system that lets you manage and track your source code history.
- GitHub
- A Git respository hosting service for your version control projects, or, online storage for your projects which can be navigated through in a web browser.
- A graphical representation of your Git respository.
- The place for other team members to collaborate with your repository.
- GitHub Desktop
- A program which allows you to easily create and manage your GitHub repositories from your machine.
How to use Git in your course work
1. Create a GitHub Account / Download GitHub Desktop
Go to GitHub.com and create an account, if you don't already have one. Once you have logged in to your account download the GitHub Desktop client. Make sure you download the proper client for your machine.Once your download has completed, launch the GitHub Desktop application.
2. Create Your Unity Project
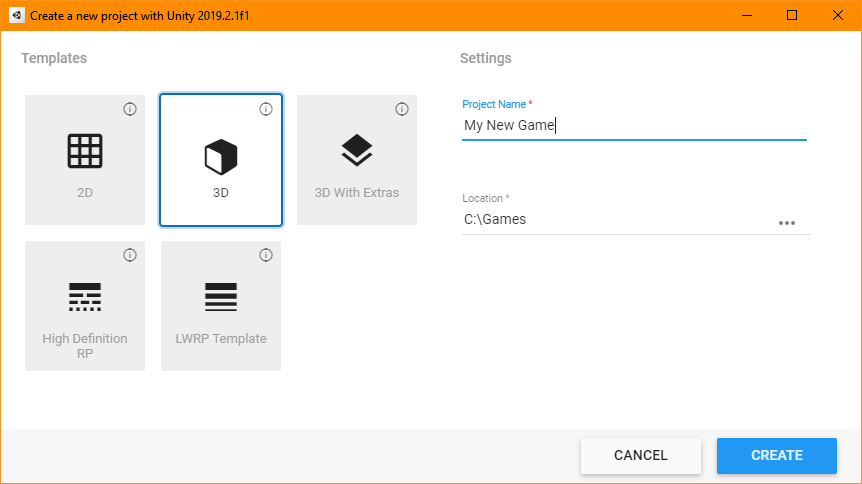 Next, we are going to create a new Unity project. Make sure to create your games in an easy to access location, and avoid folders that are part of
Microsoft OneDrive backup or anything similar, as it can cause problems with Git. When you've chosen the corrent Unity version and folder location, click CREATE.
Next, we are going to create a new Unity project. Make sure to create your games in an easy to access location, and avoid folders that are part of
Microsoft OneDrive backup or anything similar, as it can cause problems with Git. When you've chosen the corrent Unity version and folder location, click CREATE.This will create a folder which will also act as the root of our local repository, meaning that anything inside this folder will be tracked by Git and added to our remote (online) repository. We don't want everything to be added to our remote repo, because Unity generates a ton of files that are not needed by Git, so we will add a
.gitIgnore file later to save us some disck space.Once your new Unity project has been generated (this may take a few minutes) you are ready to create a GitHub repository of your new game.
3. Create a New Repository
 You now have a Unity project that you're ready to start tracking with Git. To start this process, you need to tell GitHub that you want to create a repository there.
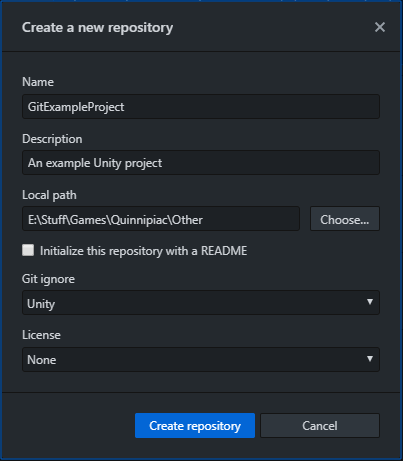
In GitHub Desktop click
File -> New RepositoryThis will allow you to designate where you want your local repository to live. Pay attention to the LOCAL PATH and Name! The Local Path should be the path to the parent folder of your Unity project's folder. The Name should be the EXACT name of your Unity project's folder.
This path/name structure means that the repository will be created in your Unity project's root folder, allowing it to properly track your project.
After ensuring the correct path/name have been selected, add Unity to the Git Ignore dropdown menu. This will prevent Git from tracking the unnecessary Unity files and will make your remote repository file size much smaller (and easier to navigate!).
Double check that you've filled out each field properly, then click Create Repo.
You now have a local Git repository in your Unity project!
4. Add Git LFS to Your Project
 Because your project may contain large files like images, music, and models, we want to make sure we use Git - Large File Tracking to our repository. This will
keep the size of your project smaller and make it easier to manage, and prevent some other potential problems.
Because your project may contain large files like images, music, and models, we want to make sure we use Git - Large File Tracking to our repository. This will
keep the size of your project smaller and make it easier to manage, and prevent some other potential problems.First, you will need to download Git LFS and install it on your machine. Instructions can be found on the download link.
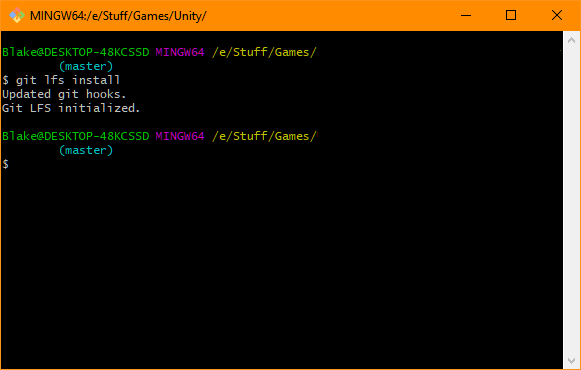
Once Git LFS is installed, open GitHub Desktop and find on the toolbar
Repository -> Open In Git Bash (GitHub Desktop should include Git Bash but if you have an issue
launching it you'll need to install it separately). Inside of Git Bash you should see that you are in your game's repository. Type git lfs install to tell your repository
to use LFS in it's tracking.Git LFS has now generated a file in your local repository called
.gitattributes, which will tell it which files to manage with LFS. It's mostly empty currently
so the next step is to download this example file and copy the text from it over whatever is in your .gitattributes file. You
can then save the file. 5. Commit Your Changes
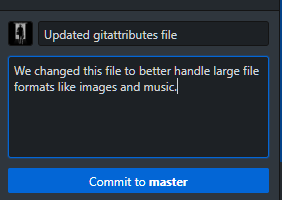 Once you save the changes to the file, you should notice that GitHub Desktop has tracked a change in your repository. This is the change to the file you just edited. Because the file
has been changed, GitHub Desktop is showing the file in the Changes tab.
Once you save the changes to the file, you should notice that GitHub Desktop has tracked a change in your repository. This is the change to the file you just edited. Because the file
has been changed, GitHub Desktop is showing the file in the Changes tab.To tell Git that we want to keep this changed file we have to commit the changes to the repository. You can enter a name and description for the commit so that you can easily tell what was changed later when you look through all of your commits.
6. Publish Your Repository
Git is now tracking your Unity project on your machine, but GitHub (the website) doesn't know about it yet. To copy your local repository to GitHub click Publish Repository.Make sure you've unchecked
Keep this code private (so that your professor can access your work) and then click Publish Repository.Once your repository has been copied to GitHub you can click
View on GitHub (or navigate through a browser) to see your Unity project in your online repository.You should see that your repository now has all of your Unity folders, and 2 Commits. These are the initial repository commit, and the changes we made to the gitattributes file.
You can now start working on your Unity game, and whenever you are ready to commit your local updates to your remote repository you just need to commit the changes, and then push your branch. Now your project is stored online and easy to share!

Chris Blake
Chris Blake is an adjunct professor of game design and development at Quinnipiac University.