Introduction
Welcome to GDD200!
GDD200 will introduce students to creating digital games in Unity and writing code in C#. Students will learn how to navigate the Unity editor, add GameObjects to their scene, and how to attach components to them. The lessons learned in this course will serve as a foundation for a career in Unity development for programmers and artists.
Learning Objectives
- Students will:
- Learn how to use core Unity features.
- Learn the basics of writing scripts in C#
- Learn how to use their code to create an interactive experience in Unity.
- Create games.
Introduce Yourself
- Let us know who you are, why you're here, your experience in game development, and the area of game development that you're most interested in
- Show off or discuss anything you've made in the past
- Tell us your favorite game/genre
Getting Started
- Review the course syllabus.
- Download and install Cyberduck to connect to MyWebspace FTP . Instructions on how to connect
- Cyberduck will allow you to copy files from your computer onto a server so that they can be viewed from the internet. This is how you will share your work.
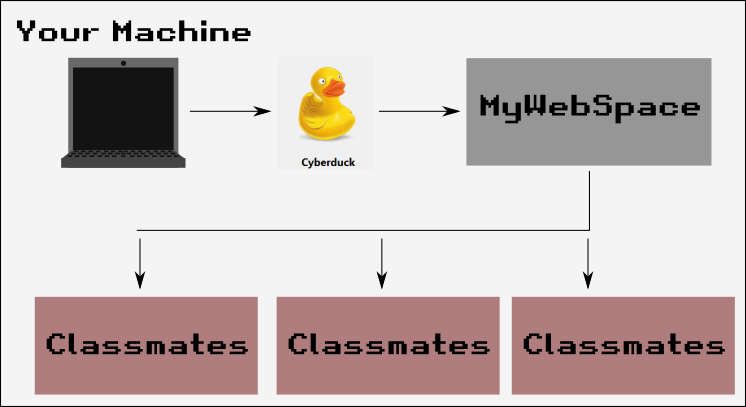
- Note when connecting: User name "mywebspace.quinnipiac.edu|QUUsername" (there is a pipe before you enter your QU Network Username)
-
How to login to MyWebspace through CyberDuck:
- Copy this example Coursework Site to your computer and change the HTML to display your name.
- This website will host links to all of your work. When you build an exercise or project it will generate a webpage. The links on this page will point us to your builds.
- To save the page: Open the page > right-click on the background > select Save Page As. Create a folder on your computer for your GDD200 work, ex: c:/GDD/GDD200/Portfolio and save the webpage in there as index.html.
- Open your portfolio in a text editor so you can change the HTML to work for your account. Use VS Code if you need a text editor.
- Change the name at the top to your name, change the cblake inside all of the links to your username.
- You can now upload a copy of your portfolio to MyWebspace. Inside CyberDuck make a directory called 200, and drag your index.html file into it. To make sure it works you can try clicking the link to your name in the Student Work section or navigating to: http://mywebspace.quinnipiac.edu/username/200/
- This is the most basic example of a working portfolio, I encourage you to explore HTML, CSS, and JavaScript to make it look more interesting!
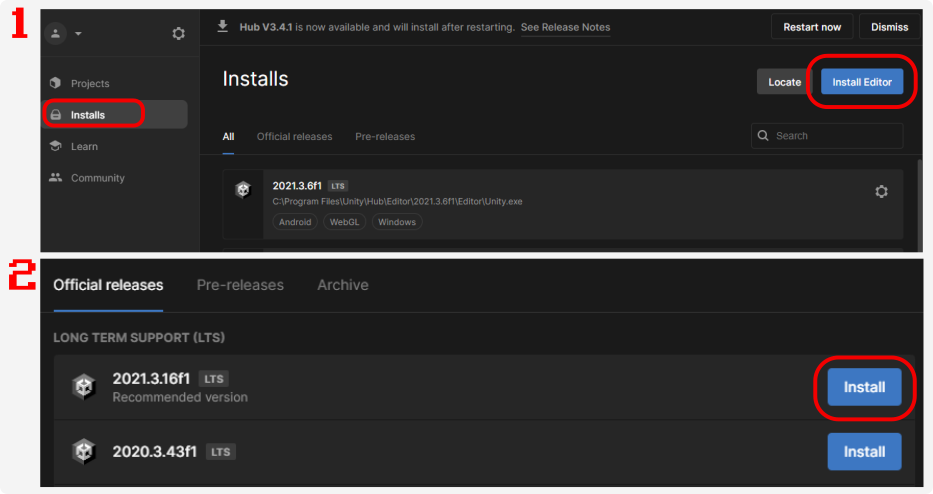
- Install
Unity Hub . This is a launcher that will help organize your projects and Unity versions over the course of your education and career. - Launch Unity Hub and Install 6.3 LTS. As long as you find a 6.3 version, it will work fine.
- Installs > Install Editor > Unity 6.3 LTS
- Required Modules: Microsoft Visual Studio 2019, WEBGL Build Support, Windows Build Support. Once you have selected these modules you can begin installation.
- Create a new Unity Project in Unity HUB.
- Projects > New (drop down to 6.3 LTS)
- Choose 2D.
- Name the project "IntroToUnity"
- Select a location. Avoid SPACES in the path. Avoid OneDrive or Dropbox Folders. Start organizing your work early, recommend a path like: C:\UnityProjects\GDD\GDD200\Intro
- Join the GDD
Discord Channel and introduce yourself. This is a place for GDD students to stay in touch outside of the classroom. Ask questions, help each other.
Assignment Set 1
Introduction to Unity
In this assignment set we will begin to explore the Unity editor and learn how to use it to build our games. We will then discuss the Game Object/Component system that Unity
uses to give our games functionality. We will end this assignment set with a deep dive into two of the most common components used in Unity: Transform and Sprite Renderer.
We will then dive into the programming language c#, which we'll be using to write scripts for our games in Unity. We'll talk about various programming concepts that you'll need in order to make the games you want.
Next, we will learn a few techniques that you'll use to implement common game features, like getting one of your Game Objects to reference another (think: How does Mario know what he jumped on? Was it a Goomba? A Star?)
Exercise 1.1 🔝
In Class Lecture
- Explore the Unity editor
- Scene & Game View
- Hierarchy
- Inspector
- Project Panel
- Console
- Shortcuts
- Transform Handle Keys (W,E,R,T)
- Focus Key (F)
- Focus Window (Shift+Space)
- Game Objects & Components
- Create new Game Objects
- Identify Components belonging to a Game Object
- Transform Component
- Position of Transform component is in Local space, meaning it is relative to any parent Game Objects. If it has no parent, it's parent is the world, and it's position is also in World space
- ✅ Create a second Game Object and make it a child of the first. Look at how their Transform's properties.
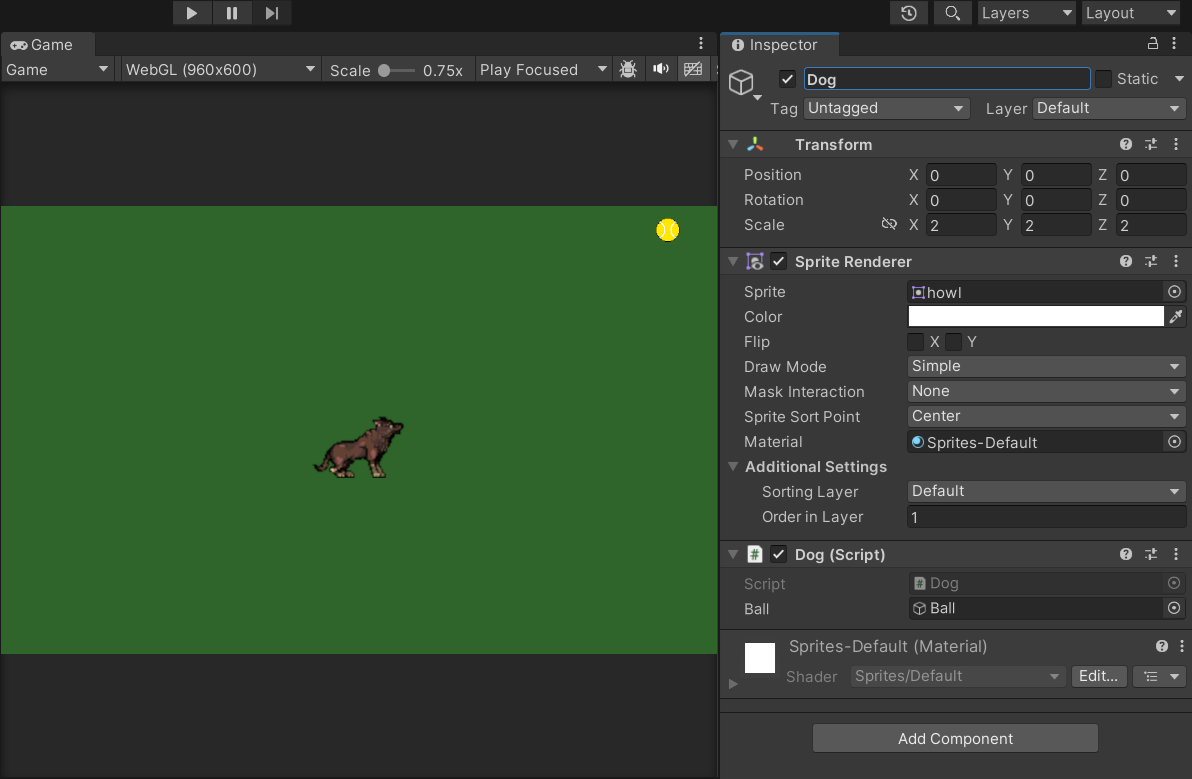
- Creating a Character with the Sprite Renderer Component
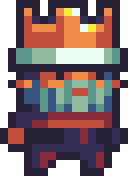
- Import a sprite Remember to credit the artist!
-
Here is an example sprite I will be using in my demonstration. From Buch on OpenGameArt.org
- Create an empty Game Object
- Add a Sprite Renderer component.
- Add your sprite to the Sprite field of the component and see how it now draws your sprite in the game.
- Experiment with the other fields on the component.
Homework
Prompt: Build a game with two game objects on the screen, each with a unique sprite.
Exercise 1.2 🔝
In Class Lecture
- Data Type
- int: Positive or negative whole numbers (-10, 2)
- float: Positive or negative numbers with decimals (-10.0f, 1f, 123.456f)
- string: Letters, words, or sentences made of letters, numbers, and other symbols. Inside double quotes. ("Hello world!", "abcDEFghi")
- bool: Boolean value, true or false. (true, false)
- Declaring and Initializing Variables and Variable Scope
int x;int x = 4;string playerName;string playerName = "New Player";- Variables declared at the class level are accessible to the class, while variables declared inside functions only exist until that function ends.
- Operators
a + b; // Arithmetic operatora == b; // Comparison operatora = b; // Assignment operator(a == b) && (b == c); // Logic operator- Conditional Statements
if (a == b) { Debug.Log("A equals B!"); } else if (a == c) { Debug.Log("A equals C!"); } else { Debug.Log("A doesn't equal B or C!"); }- Time and Game Loops in Unity
- Unity games will attempt to run as fast as the machine it's running on can, or at a target frame rate set with Application.targetFrameRate. At 30 frames per second your game will "update" every 1/30 of a second, or 0.03s.
- This frame rate is not consistant, heavy load can cause the frame rate to drop.
- Unity will call Update() on all MonoBehaviour scripts each frame. Remember, because the frame rate is not consistant, the time between Update() calls will vary.
Time.deltaTimeis a value equal to the amount of time since the previous frame ran. This can be used to get a consistant move speed across irregular frame rates:private void Update() { transform.position += new Vector3(1, 0, 0); // This will move the position by 1 every frame. // If the frame rate decreases the position will move less distance over time. transform.position += new Vector3(1 * Time.deltaTime, 0, 0); // This will move the position by delta time every frame. // If the frame rate decreases, the position will move farther each frame // leading to a consistant distance over time. }- Functions
- MonoBehaviour functions Start() and Update()
- Passing arguments into a function:
Debug.Log()takes a string as a parameter, which it prints in the console. - ✅ Write a function that prints out a number.
- ✅ Write a function that prints out a number we pass into it.
- ✅ Write a function that adds 1 to a number we pass in and returns the new number.
- Getting User Input
- GetKey() function. Returns a
bool, true if the key matching the keycode is down. Input.GetKey(KeyCode.Space)will returntrueif Space is pressed/down.Input.GetKeyDown(KeyCode.Space)will returntrueif Space is pressed only in the first frame of it being pressed, thenfalse.Input.GetKeyUp(KeyCode.Space)will returntrueif Space was pressed previously, and was released in the current frame.- ✅ Write a function that prints out a message for each of the input GetKey types.
Delta Time Demo
Homework
Prompt: Create a game where the player can move a game object using the keyboard. The game object should have a sprite and a script which handles the movement.
The game object's position should wrap around the screen, so if it moves off the screen to the right it should come back in from the left.
To change a position of a game object you need to modify the position property of the game object's transform component. The position is a Vector3, a type of variable which has a X, Y, and Z value.
To set the position of a transform use:
transform.position = new Vector3(0, 0, 0);To perform an arithmetic operation on a position you can use:
transform.position += new Vector3(1, 0, 0);Remember to use Time.deltaTime when moving a position across multiple frames in a row.
Wrapping Example: wrap the x position of a transform if it goes off the right side of the screen.
float gameWidth = 5f;
if(transform.position.x > gameWidth)
{
    transform.position = new Vector3(-gameWidth, transform.position.y, 0f);
}
Exercise 1.3 🔝
In Class Lecture
- Continue practicing with programming basics
- Learn how to reference other game objects and components in the scene
- Sometimes you can assign the reference in the inspector, if both objects are in the scene at the start of the game
- Create a
publicvariable with the same data type as the reference you want. If you want a reference to another Game Object use:public GameObject OtherGameObject; - Other times you need to find the reference at run time. These are a few ways to do that, but they need to be used carefully as sometimes they will find something you weren't expecting, and they can be very resource hungry if used improperly
- Using
FindObjectOfTypeto find a game object with a particular component attached().gameObject; - Using
GameObject.Find("GameObjectName")to find a scene game object by it's name - Using
GameObject.FindGameObjectWithTag("TagName")to find a scene game object tagged with a tag. - Learn how to get components using GetComponent();
- GetComponent will look for a component attached to the Game Object that is calling the function:
public SpriteRenderer MySpriteRenderer; private void Start() { MySpriteRenderer = GetComponent<SpriteRenderer>(); // This will assign the SpriteRenderer component which is on the same Game Object as this script to MySpriteRenderer } - GetComponent can also be called on a component to get other components on the same GameObject:
public SpriteRenderer EnemySpriteRenderer; public Transform EnemyTransform; private void Start() { EnemySpriteRenderer = EnemyTransform.GetComponent<SpriteRenderer>(); // This will assign the variable EnemySpriteRenderer to the SpriteRenderer component on the same Game Object as the EnemyTransform component. } - Once you have a reference to a component, you can access it's public functions and variables:
private void Start() { SpriteRenderer sr = GetComponent<SpriteRenderer>(); // Create a variable called "SR", whose type is SpriteRenderer. Initialize the variable with the SpriteRenderer found using GetComponent. sr.color = Color.red; // Set the color property of sr to red. } - ✅ Combine the use of the Find functions and GetComponent functions to have one script change the color of the sprite on another Game Object.
Find functions, but we'll get to those later. Learn how to use
these for now but don't get too attached!
Homework
Prompt: Build a game where a script attached to one Game Object references another Game Object and changes something about it.
This could be changing it's position/rotation/scale by modifying it's Transform component. Or you could change a property of the SpriteRenderer component, as in this example:
Project 1 🔝
Your First Game
Your goal for Project 1 is to build a simple game using what we've covered so far. This means it should include:- Movement: Changing the position of Transform components creates movement. You can add to a position to create movement in a direction, or just change a position to teleport.
- Sprites: Add at least two unique sprites to your game.
- An objective: Give the player something to do. They can move to a position, time an input, rotate shapes, change colors, etc.
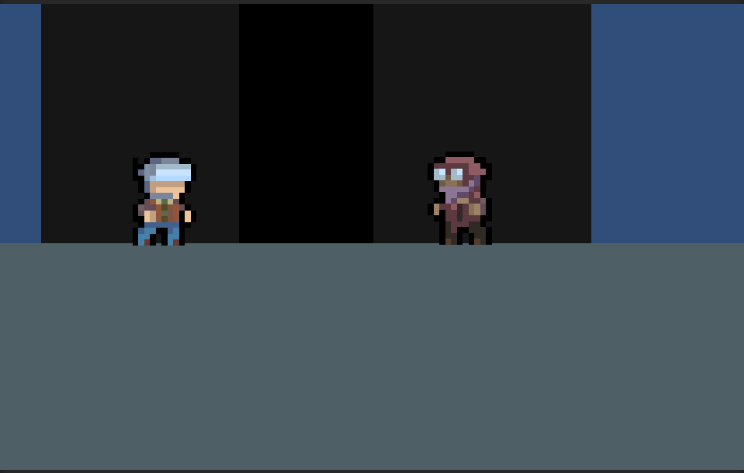
Example 1
Click here to play
In this example the player moves left-to-right at an increasing rate as they wrap around the screen.
They need to jump over the other character by timing their jump right and hitting Spacebar to clear the jump.
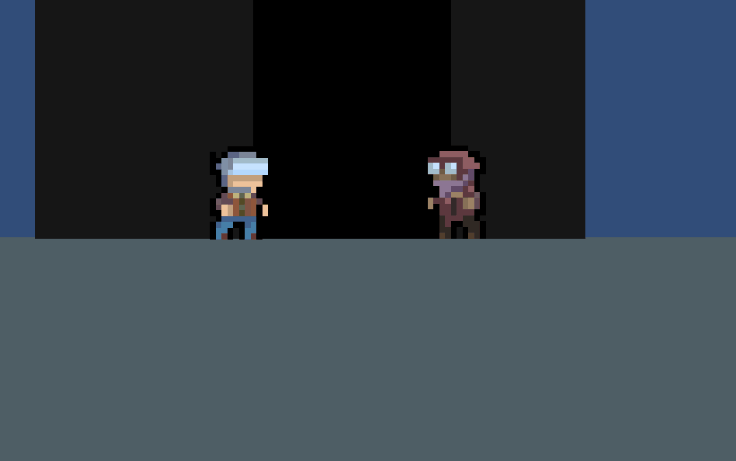
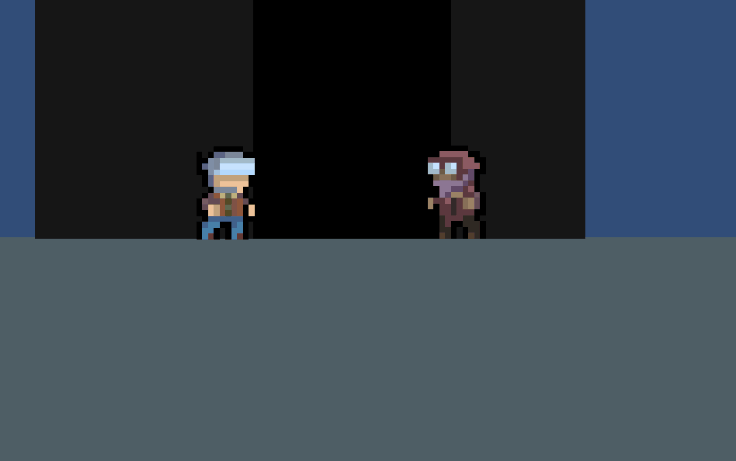
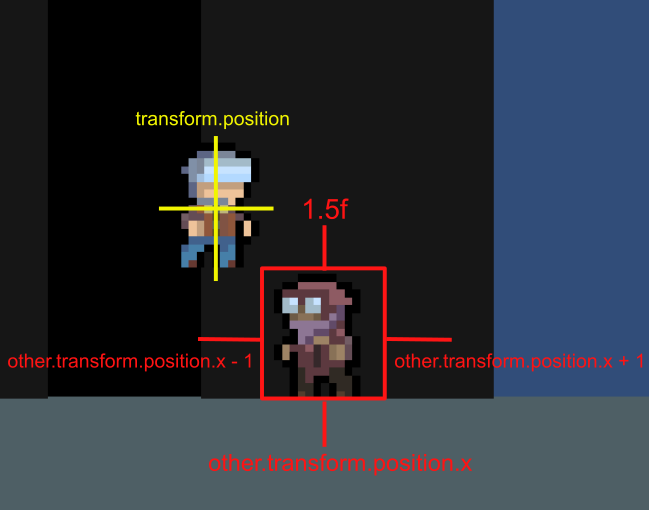
The game works by comparing the player's transform.position.x to the other character's to see if they should hit.
Example 2
Click here to play
Example 2 demonstrates a simple method of moving a character around inside a scene, and checking the distance between it and another Game Object.
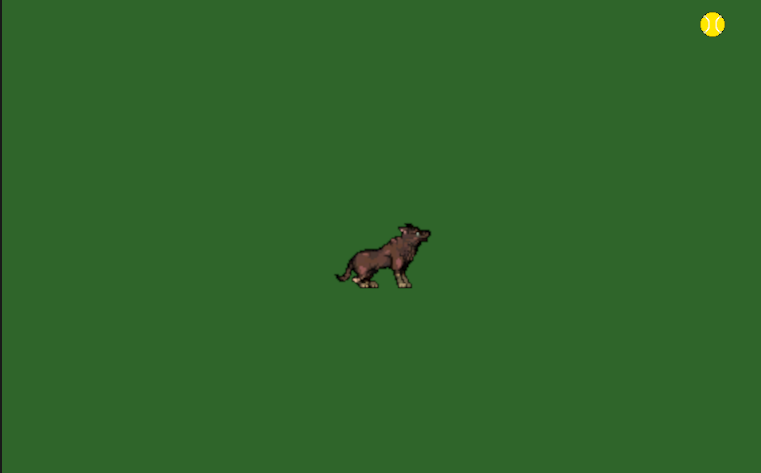
Example Dog Script
using UnityEngine;

public class Dog : MonoBehaviour
{
	public GameObject Ball;  // Reference to the ball GO

	private float speed = 3f;
	private SpriteRenderer sprRenderer;  // The dog's SpriteRenderer

	private void Start()
	{
		sprRenderer = GetComponent();  // Get the SR reference when this GO starts
	}

	private void Update()
	{
		// Move
		float movex = Input.GetAxisRaw("Horizontal");  // Store x input ( a/d, leftarrow/rightarrow )
		float movey = Input.GetAxisRaw("Vertical"); // Store y input ( w/s, uparrow/downarrow )
		transform.position += new Vector3(movex, movey, 0) * Time.deltaTime;  // Add to position by (movex, movey) vector
					// We multiply increase in position by deltatime to prevent
					// framerate dependencies. Deltatime is the time since last Update() call in seconds

		//Flip sprite
		if (movex < 0)
		{
			sprRenderer.flipX = true;  // Flip sprite horizontally
		}
		else if(movex > 0)
		{
			sprRenderer.flipX= false;
		}

		//Get ball
		if(Vector2.Distance(transform.position, Ball.transform.position) < 0.5f)  // if dist between dog and ball is less than 0.5
		{
			Ball.transform.position = new Vector3(Random.Range(-4.3f, 4.3f), Random.Range(-2.6f, 2.6f));  // Randomize ball position
		}
	}
}
Platformers are notoriously difficult to get working and there are so many other interesting types of games to create!
Assignment Set 1 Code Snippets🔝
Look at the Unity console to see how these functions work when you run the game.
private void Start()
{
  Debug.Log("Start"); // Start is called when this component is activated. If it's active when the game starts, it will be called when the game starts.
}

private void Update()
{
  Debug.Log($"Update {Time.time}"); // This lets us print a variable inline with our Debug.Log string. Time.time is the total number of seconds since the game began.
}
Move a Game Object by adding to it's position in Update.
private void Update()
{
  transform.position += new Vector3(1f * Time.deltaTime, 0f, 0f); // Remember to multiply by deltaTime if moving across multiple frames.
}
Make a player/object not go through the ground in a 2D side-scroller setup.
public float groundposition = -1f;
public float gravity = -9.8f;

void Update()
{
  // Apply gravity
  transform.position += new Vector3(0f, gravity * Time.deltaTime, 0f);
  if(transform.position.y < groundposition)
  {
    transform.position = new Vector3(transform.position.x, groundposition, transform.position.z); // Snap to the ground instead of going through it
  }
}
Assignment Set 2
Physics in Unity
In this Assignment Set we will learn how to use Unity's physics engine to add physics behavior to our games. This means objects can have mass, velocity, angular velocity,
be affected by gravity, and experience collisions.
To tell the physics engine that a Game Object should be a physics object it needs a RigidBody or RigidBody2D component.
AddForce() will add a force to a physics object.
Exercise 2.1 🔝
In Class Lecture
- GitHub - We will learn how to use GitHub to clone a repository.
- I have made a Unity project with examples to use for AS2.

- I used Git to create a copy of the project and upload it to GitHub, the website.
- You can download the example project from GitHub so that we all have the same Unity project.
- ✅ Create a GitHub account.
- ✅ Download and install GitHub Desktop. Make sure you choose Windows/Mac accordingly.
- ✅ Go to the AS2 GitHub Repository. Click then select Open With GitHub Desktop.
- ✅ Choose a path to save the project to on your computer. Make sure the path is not a OneDrive folder, and contains no spaces or special characters (underscores and dashes are okay)
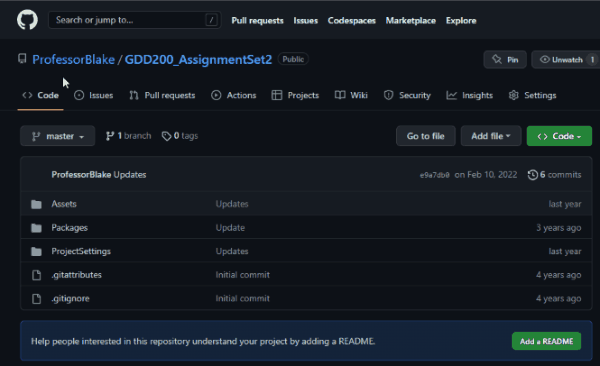
- Congratulations! You now have a copy of the project on your computer. Open it by going into Unity Hub and selecting Open.
- Physics in Unity
- We will discuss the physics engine and some of the core components of a physics object, Rigidbody2D and Collider2D
Homework
Prompt: Build a game with physics objects that fall to the ground and bounce. For physics objects to bounce you will need
a Rigidbody2D component and a Collider2D (circle, box, etc.) on your moving object and a Collider2D on the ground.

Exercise 2.2 🔝
In Class Lecture
- Physics in 3D
- Create 3D physics objects using Unity primitives (Sphere, Cube, etc.)
- Controlling RigidBody2D Components
- Applying impulses
- Applying constant forces in FixedUpdate
- Prefabs
- Prefabs are blueprints for Game Objects that you can create copies of
- Instantiate / Destroy
- Instantiate GameObjects to spawn prefabs into your scene
- Destroy GameObjects to remove them from your scene
- Lists
- A List is a collection that lets you easily add and remove items.
- Use a list to store references to instantiated Game Objects, so that you can reference them later.
Homework
Prompt: Build a game where the player can apply forces to a physics object, properly using Update/FixedUpdate

Exercise 2.3 🔝
In Class Lecture
- Collisions occur when a GameObject has a RigidBody and Collider (or RigidBody2D and Collider2D)
- Triggers occur when a GameObject has a RigidBody and Collider with IsTrigger checked
- Learn how to call functions on scripts when a collision event or trigger event occurs on a GameObject
- Remember: These events will be called on other components attached to the same GameObject as the RigidBody
private void OnCollisionEnter2D(Collision2D collision)
{

}

private void OnTriggerEnter2D(Collider2D collision)
{

}
private void OnCollisionEnter2D(Collision2D collision)
{
  SpriteRenderer hitSprRend = collision.gameObject.GetComponent();
    if(hitSprRend != null)
    {
      mySprRend.color = hitSprRend.color;
    }
}

private void OnTriggerEnter2D(Collider2D collision)
{
  HealthItem item = collision.gameObject.GetComponent();
    if (item != null)
    {
      myHealth += item.healingValue;
    }
}
Homework
Prompt: Build a game where the player interacts with colliders and triggers.
The collisions and/or the trigger should cause something to happen in the game (change a sprite color, enable/disable a GameObject, create/destroy an object, etc.)
Project 2 🔝
Physics Game
Your goal for Project 2 is to build a physics game. You should work with 2D physics, but can use 3D if your game idea requires it. It should include:- RigidBodys: Your physics objects need to have RigidBody components to use the physics engine.
- Collisions/Triggers: Your physics objects should be able to detect what they are contacting and it should affect the gameplay. (Take damage, collect item, open door, etc.)
- An objective: Give the player something to do.
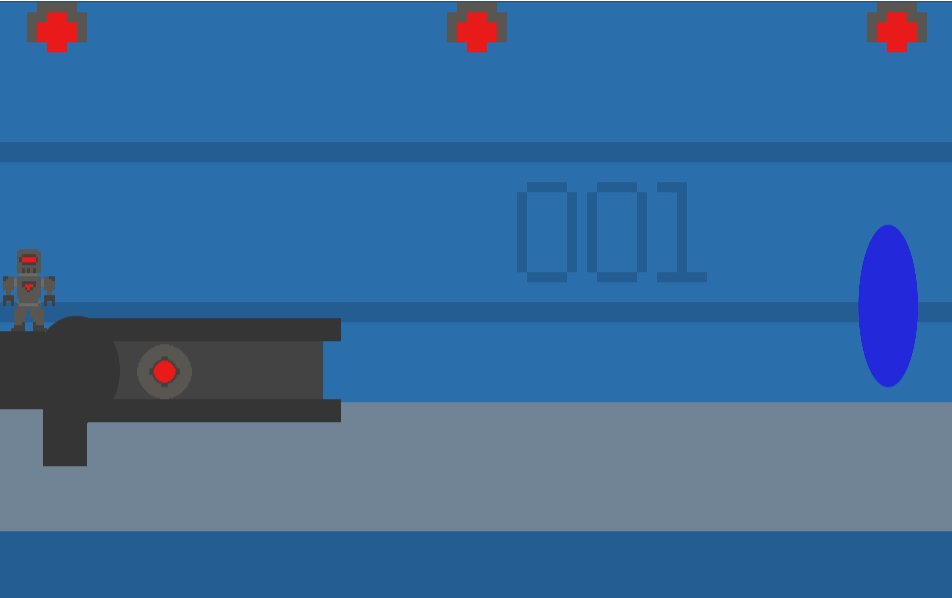
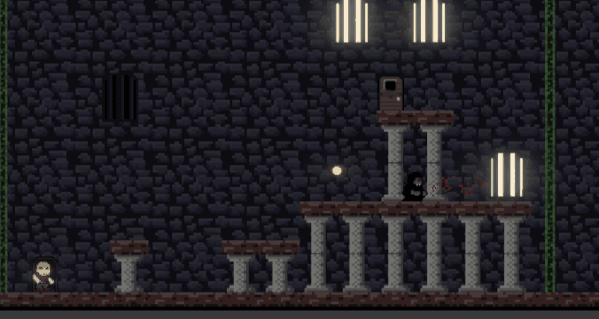
Example
Click here to play
Game by James Russo 2022
In this game the player moves a GameObject around by adding forces with the arrow keys. They can change to level 2, and then attack the enemy by hitting it with the ball.
Assignment Set 2 Code Snippets🔝
Assignment Set 3
Assorted Skills
In this Assignment Set we will learn an assortment of skills needed to expand our abilities.
Exercise 3.1 🔝
In Class Lecture
- Clone Assignment Set 3 Repository
- ✅ Go to the AS3 GitHub Repository. Click then select Open With GitHub Desktop.
- Prefab Refresher
- How to create and edit prefabs
- How to reference prefabs after creating them
-
  GameObject newGameObj = Instantiate(BallPrefab, transform.position, Quaternion.identity);
  Rigidbody2D ballrb = newGameObj.GetComponent<Rigidbody2D>();
  ballrb.AddForce(new Vector2(1, 0.5f) * 10f);
Homework
Prompt: Build a game that uses instantiated prefabs in an interesting way. Get creative and see what you can make.

Play Here
Exercise 3.2 🔝
In Class Lecture
float r = Random.value; //Random.value will return a float between 0.0 - 1.0
Random.Range(0, 5);   // Returns a random int 0,1,2,3,4
Random.Range(1f, 5f); // Returns a random float 1.0 - 5.0
- For Loop
for (int i = 0; i < 5; i++) { Debug.Log(i); } string[] names = new string[3] { "Alice", "Bob", "Charlie" }; for (int i = 0; i < names.Length; i++) { Debug.Log(names[i]); }- Foreach Loop
string[] names = new string[3] { "Alice", "Bob", "Charlie" };
foreach(string s in names)
{
  Debug.Log(s);
}
- Contains - Check to see if an item is in a list
List
names = new List () { "Alice", "Bob", "Charlie" }; if (names.Contains("Bob")) { Debug.Log("Bob is here."); } else { Debug.Log("Bob is absent."); } - Find - Look for a coin that has moved off the screen and remove it
List
coins = new List (); GameObject removeCoin = coins.Find(x => x.transform.position.x < 5); if(removeCoin != null) { coins.Remove(removeCoin); Destroy(removeCoin); }
Homework
Prompt: Build a game that uses randomness in an interesting way. Get creative and see what you can make.

Play Here
Exercise 3.3 🔝
In Class Lecture
- Time class controls in game time
Time.deltaTimeis the total number of real-world seconds since the last timeUpdate()was called. This is usually a very small number.Time.timeScalerefers to a time multiplier. Time properties likeTime.deltaTimeare affected by this number so decreasing the timeScale will decrease your deltaTimes. If a timer is using deltaTime to countdown, it will take longer to count because smaller numbers are being subtracted.
Movement that is multiplied by deltaTime will also be slower
Project 3 🔝
Random Game
Your goal for Project 3 is to build a game that has a randomly generated/populated level or play experience, so that each time you play it is a different experience.You can have the geometry of the level change at the start of the game, instantiate random items/enemies, change the position of the level exit, randomize where the player starts, change the gravity of the level, change the abilities of the player,etc.
- Use
Random.valueand/orRandom.Range()to make your game different with each play. - Include a way to restart the level/game, you can use
SceneManager.LoadScene(0);to reload the first scene of your build. Remember to includeusing UnityEngine.SceneManagement; - An objective: Give the player something to do.
Example
Click here to play
Game by Som Sing 2022
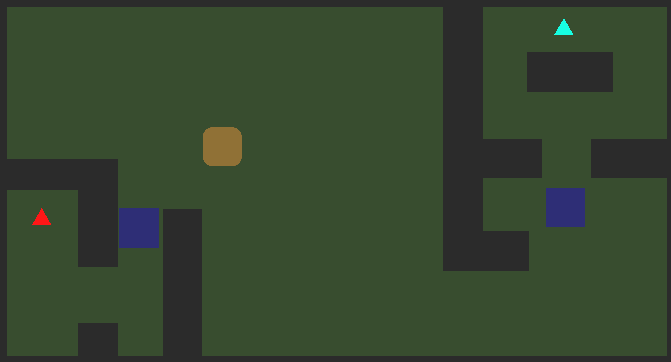
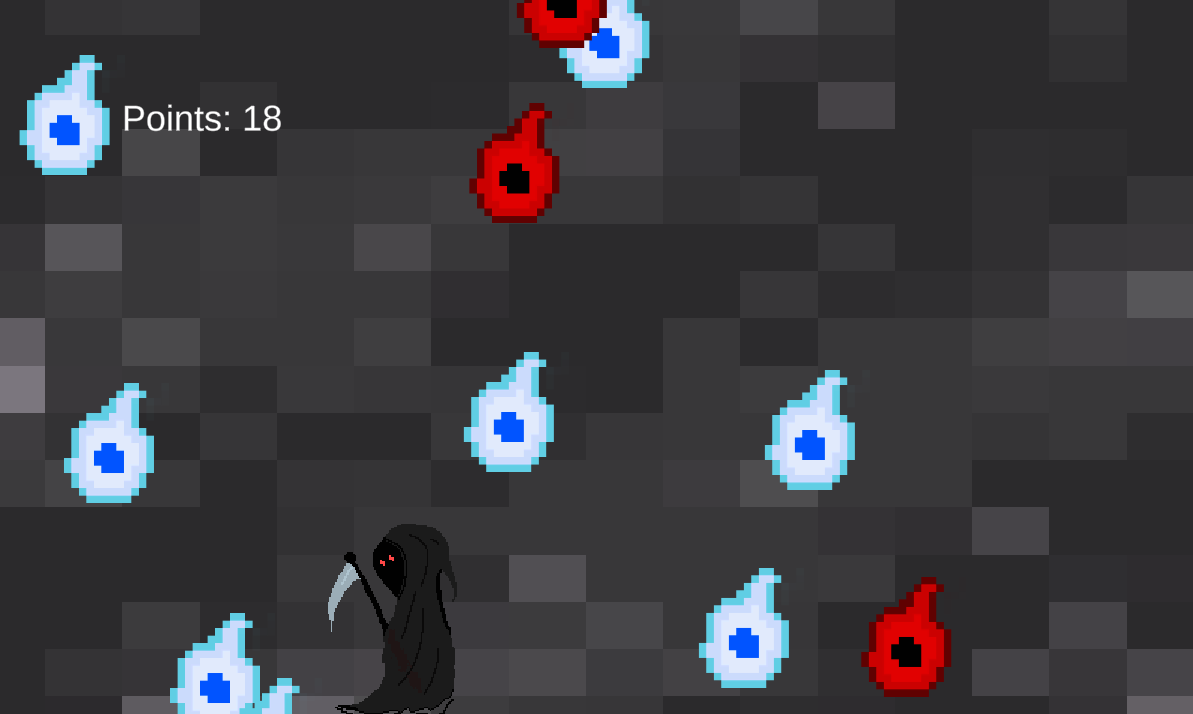
In Som's game, the souls spawn in random positions so that the player has be sure to avoid red souls while collecting the blue souls.
Assignment Set 4
User Interface
In this Assignment Set we will learn how to set up a canvas for displaying UI elements on the screen, and how to bind functionality to the various UI components.
Exercise 4.1 🔝
In Class Lecture
- Clone Assignment Set 4 Repository
- ✅ Go to the AS4 GitHub Repository. Click then select Open With GitHub Desktop.
- Understanding the Game View
- Creating a Game View Preview Resolution
- Creating a Canvas
- Render Modes
- Scaling
- Anchoring
- Adding support for Text Mesh Pro
- Rendering text on the UI
- Creating a font asset (Find fonts at DAFont)
- To create a Text Mesh Pro Font Asset from your font file:
Right Click on the font file > Create > TMP > Font Asset. This will generate a new TMP Font asset that can be used to set the font of your TMP Text.
- Setting TMP Text from a script
- Add the TMP library to your script. This allows your script to use the TMP components like TMP Text.
using System.Collections; using System.Collections.Generic; using UnityEngine; using TMPro; // Add this - Create a variable to store a reference to the Text Mesh Pro Text component that you want to set. Then, set the
.textproperty of that component to change the text it's showing.using System.Collections; using System.Collections.Generic; using UnityEngine; using TMPro; public class MyClass : MonoBehaviour { public TMP_Text myText; // This is the TMP Text component on a GameObject in your scene private void Start() { myText.text = "Hello world!"; } }
Homework
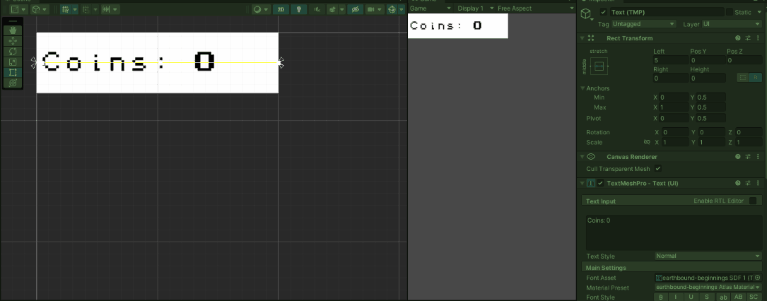
Prompt: Build a game that displays properly anchored text on the UI. The text should change during runtime, either automatically or when pressing SPACEBAR. In this example, the coin counter UI is anchored to the top-left of the screen.
Exercise 4.2 🔝
In Class Lecture
- Visual UI Components
- Add the UI library to your script. This allows your script to use the UI components like Image.
using System.Collections; using System.Collections.Generic; using UnityEngine; using UnityEngine.UI; // Add this - Text: Display text within a RectTransform. Always use Text Mesh Pro Text instead of the legacy text component!
- Image: Display an image on the canvas. Much like a SpriteRenderer component, you can set the Sprite property to display a sprite.
- Image Type can be used to modify the output of the image component. Slicing will let you scale an image without stretching the border. Tile will let you repeat your sprite in a pattern. Fill will show a portion of the image based on the fillValue.
- Interactive UI Components: These components are configured to perform common functions like handling clicks, moving sliders, and accepting user input.
- Button
- Buttons can call a function when clicked. Set the OnClick event to call a function on a GameObject's component or change a variable. Here's an example for a function called
OnPressed()
public TMP_Text myText; public void OnPressed() { myText.text = "You pressed the button!"; } 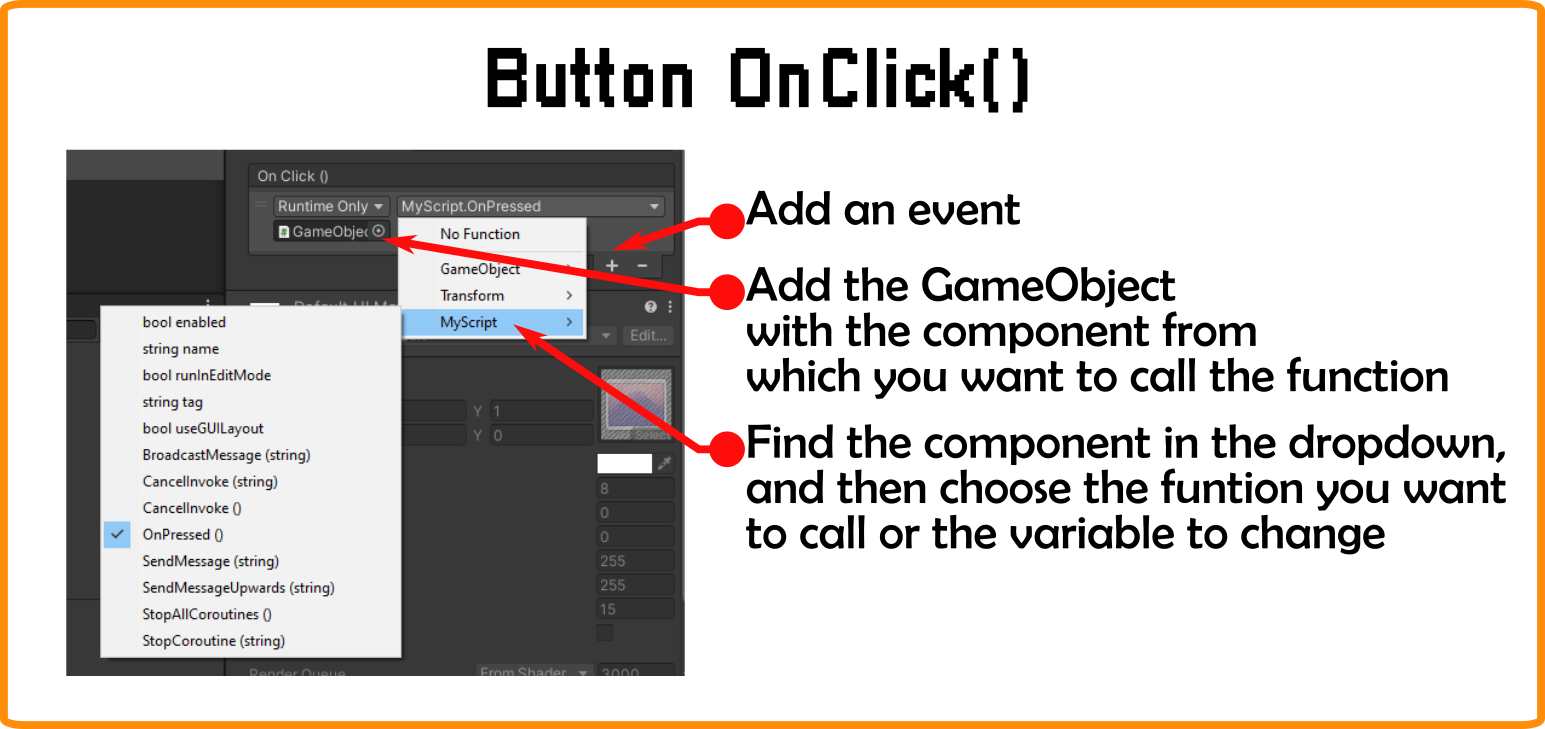
- Other UI Components
- Toggle
- Slider
- Input Field
Homework
Prompt: Build a game that uses at least one UI Button to control a mechanic.
Exercise 4.3 🔝
In Class Lecture
- Creating a dialog system
- There are various ways you might make a dialog system in a game. We'll explore a simple but effective method.
- First, let's identify what exactly we want this system to do:
- 1. When a character walks up to an NPC a dialog window should appear.
- 2. While the window is showing, parts of the dialog should appear.
- 3. When the player presses SPACEBAR the messages should cycle through the conversation.
- 4. After the last message, the window should close.
- Potential options: Typing Text, Proximity Trigger, Dialog Options
Homework
Prompt: Build a dialog system that cycles through at least 3 messages.

Project 4 🔝
UI Game
Your goal for Project 4 is to build a game that uses UI in a meaningful way. Consider a score counter, health bar, dialog, buttons, inventory, etc.You can use a previous project as a starting point to build out UI elements on top of.
Proper anchoring is required!
Example
Click here to play
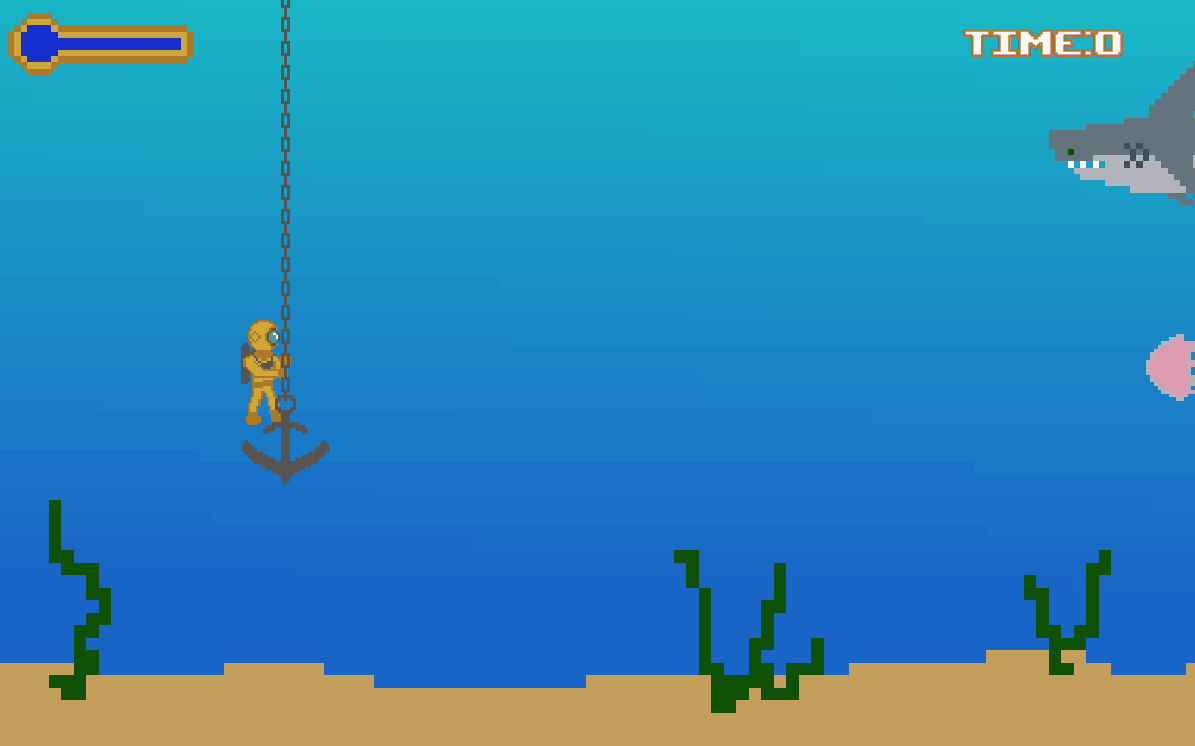
Game by James Ruso 2022
In James' game you must avoid the sea creatures for as long as possible using WASD to move.
Assignment Set 5
Animation
In Assignment Set 5 we will learn how to create animations in Unity. We will start with drawing a sprite sheet, slicing the sheet in Unity's Sprite Editor, use the Animator component to play the animation, and finally, write a script to control the Animator. We will also learn how to use Animation Events and create Tweened Animations.
Exercise 5.1 🔝
In Class Lecture
- Clone Assignment Set 5 Repository
- ✅ Go to the AS5 GitHub Repository. Click then select Open With GitHub Desktop.
- Drawing a spritesheet - A spritesheet is a series of sprites all drawn to a single image. These can be massive images containing
all of the images from an entire game or smaller images containing just the sprites for a single character and their animations.

Spritesheet by Bluch - Spritesheets can be created in any art program, raster or vector based. For pixel art we will use a raster art program:
Homework
Prompt: Build a scene where a player can control at least two animations (ex: idle and walk).
It does not need to be a human, or even a living thing. Get creative! You can draw your own sprites, or find spritesheets online.
You must credit the artist if you use art you didn't make.

Exercise 5.2 🔝
In Class Lecture
- Animation Events - Animation Events allow you to trigger an function call from a specific frame of an animation. This can be used to play particle effects, set a variable, trigger an animation on another gameobject, etc. Here are some examples of when you might use And Animation Event:
- Reload: If your player needs to reload a weapon in order to continue using it, there needs to be a specific moment at which their ammunition variable is reset. It is often the case that this variable doesn't reset as soon as the animation starts, but at a moment in the animation that makes sense. An Animation Event can be used to reset this variable at the right moment.
- Trigger Hitbox: In a fighting game, where a character has an animated melee attack, there might only be a few specific moments within that animation that should trigger a hit. An Animation Event can be used to enable and disable the hitbox at those exact moments.
- To create an Animation Event
- Create your animation.
- In a script attached to the same gameobject as the Animator component create a function you wish to call.
- In the Animation window, on the Timeline, navigate to the frame you wish to trigger the event.
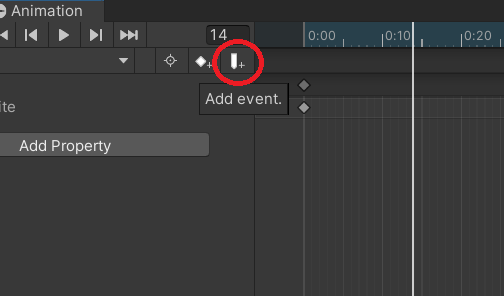
- Select the event tab you just created and in the Inspector select your function.
Homework
Prompt:Create and animation that calls a function using an Animation Event.
Exercise 5.3 🔝
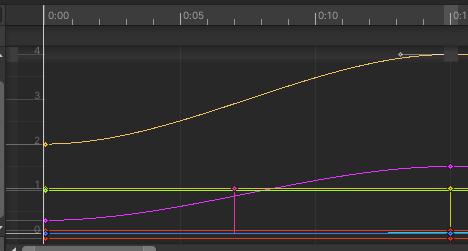
In Class Lecture
- Tweened Animation - Animations are changes in properties of a GameObject's components over time, as we've seen with the SpriteRenderer - Sprite based animation. You can also create animations using changes to the transform of a GameObject, or a series of GameObjects, in order to create smooth movement.
- Tweened animations require the use of key frames in an animation to smoothly move between positions over time.
To create a tweened animation: - Select the GameObject you want to animate, and ensure the Animation window is recording.
- At the start of the animation (frame 0) set the position/rotation/scale you want the animation to start at. Make sure the settings are added
as a keyframe to the timeline.
- Navigate to the time in the animation where you want the next keyframe, and manipulate the transform to where you want it to go.
- If you want a smooth looping animation, copy the first frame into another keyframe at the end of the animation. This will allow your animation to ease back into the starting frame.
- Curves control the easing of a tween. A linear curve will transition at a constant rate from A to B. An "S" curve will slowly accelerate it's
rate of change, then decelerate to ease in and out of A to B. To edit an animations curves, select the Curves tab
at the bottom on the Animation window.
Homework
Prompt:Create an animation that uses tweened animations. Does not need to
be a game but can be something more artistic if you'd like.
Project 5 🔝
Animation Game
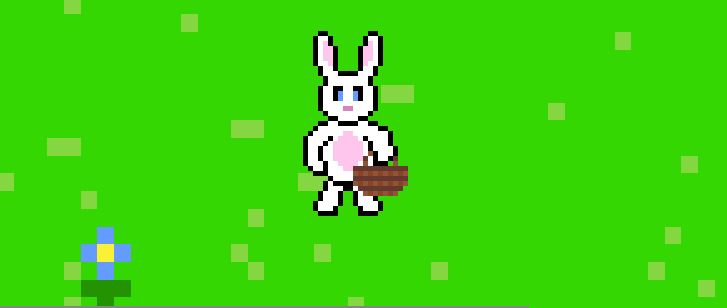
Create a game that uses animation in an interesting way. There should be at least one GameObject that has at least two animations it changes between (player idle/run, elevator doors opening/closing, car idling/driving, etc.)Example
Click here to play
Game by Anthony Ruso 2022
In Anthony's game you walk around collecting easter eggs.There are animations for walking left/right, up, and down.
Final Project
One Button Game
 Flappy Bird - Dong Nguyen
Tap anywhere to launch upward and let gravity bring you back down.

Tap and hold to accelerate upward, or let go to fall down.
This project is designed to give students a chance at designing and building a larger scoped game, where they will use playtest feedback to
iterate on their designs.
The One Button constraint is designed to limit the scope of the game, helping to prevent over-scoping and allowing students to focus on delivering polished
gameplay using simple mechanics.
Research
Play some one-button games and analyze what you like, and don't like, about each one. Identify what makes for a compelling one-button game. Can a one-button game evoke emotions as you play? Can they tell a story? Can their gameplay be engaging? Review some of these one-button games.
Design
In the Design Phase of the project, you are encouraged to put great thought into what game you will make.
Use brainstorming techniques and assess the viability of each idea based on the your skill level and timeline for the project.
After a high level concept is selected, you should start a design document where you will begin to fully detail every element of the game. This document should
provide enough detail that anyone should be able to look at the document and derive the same understanding about any element of the game from it.
- Project Management
- Trello: Lists of Cards on which you can create tasks, attach images, and create lists.
- Miro: Corkboard/Whiteboard tool where you can add various items like lists, images, videos, documents, flowcharts, etc.
- Milanote: Corkboard/Whiteboard tool similar to Miro.
- Canva: Create high quality documents for web viewing. https://hacknplan.com/
- Design Document Creation
- Begin creating your design document. This is a living document that serves to describe exactly what the game is supposed to look and feel like. Consider detailed information about:
- Overview: This should be your elevator pitch paragraph revised to incorporate any feedback from class.
- Gameplay: Describe the game's mechanics. How does the player interact with the game? What is the player doing from moment to moment? What is the goal? When does it end?
- Game Elementss: Describe the elements in the game. How do they interact with each other or the character (if there is one)? What are their attributes? Are there NPCs that live in your world? Complex factions that shape the culture of your characters? Is the environment Earth-like, or something alien?
- Artistic Direction: What will the game look like? Why? Decisions about artistic direction should be made to evoke a feeling from the player. Is the feeling of your game fun and comical? Or is it brooding and cold? How does your art direction support this theme?
- Visual Design Document: Explain your game visually. You should include text when appropriate, but do so minimally. You may use one of the following approaches. Please choose the one most appropriate for your game. Draw.io is a great tool for creating flow charts and diagrams, however, use whatever tool you are most comfortable with. I'd highly recommend choosing the hybrid example as one of your choices.
- Hybrid: Here is a hybrid (storyboard + layout). Here is a well-executed student hybrid document. Although it could be cleaned up, it does a great job visually communicating the concept.
- Flowchart: Here is an example from a pet training game. Here is one from a narrative-based puzzle game.
- Storyboard: Here is an example. Here is another that could be cleaned up.
- Map: Here is an example. Here is another.
Bathophobia Design Document by Matthew G
Examples
- Planetary Protector - Matthew and Michael M (2021): Creative use of "one input" constraint, the mouse position is used for navigating menus, flying, and fighting enemies.